Netty 官网
可以到官网下载,也可以直接使用 maven 依赖:
1
2
3
4
5
6
7
8
| <dependencies>
<dependency>
<groupId>io.netty</groupId>
<artifactId>netty-all</artifactId>
<version>4.1.30.Final</version>
<scope>compile</scope>
</dependency>
</dependencies>
|
DISCARD 协议
官网的入门示例使用的协议是:DISCARD,最简单的协议,因为它只接收数据(然后扔掉……)而不作响应,类似 Linux 下的无底洞 /dev/null。
因为使用的是 DISCARD 协议,所以唯一要做的就是无视所有接收到的数据:
1
2
3
4
5
6
7
8
9
10
11
12
13
14
15
16
17
18
19
20
21
22
23
24
25
26
27
28
29
30
31
32
33
34
35
36
37
38
39
40
| import io.netty.buffer.ByteBuf;
import io.netty.channel.ChannelHandlerContext;
import io.netty.channel.ChannelInboundHandlerAdapter;
import io.netty.util.CharsetUtil;
import io.netty.util.ReferenceCountUtil;
public class DiscardServerHandler extends ChannelInboundHandlerAdapter {
@Override
public void channelRead(ChannelHandlerContext ctx, Object msg) throws Exception {
((ByteBuf) msg).release();
}
@Override
public void exceptionCaught(ChannelHandlerContext ctx, Throwable cause) throws Exception {
cause.printStackTrace();
ctx.close();
}
}
|
到目前为止一切正常,我们已经实现了一半的 DISCARD 协议服务端。剩下的工作就是写 main 方法,去启动带有 DiscardServerHandler 处理器的服务端:
1
2
3
4
5
6
7
8
9
10
11
12
13
14
15
16
17
18
19
20
21
22
23
24
25
26
27
28
29
30
31
32
33
34
35
36
37
38
39
40
41
42
43
44
45
46
47
48
49
50
51
52
53
54
55
56
57
58
59
60
61
62
63
64
65
66
67
68
69
70
71
72
73
74
75
76
77
| import io.netty.bootstrap.ServerBootstrap;
import io.netty.channel.ChannelFuture;
import io.netty.channel.ChannelInitializer;
import io.netty.channel.ChannelOption;
import io.netty.channel.EventLoopGroup;
import io.netty.channel.nio.NioEventLoopGroup;
import io.netty.channel.socket.SocketChannel;
import io.netty.channel.socket.nio.NioServerSocketChannel;
public class DiscardServer {
private int port;
public DiscardServer(int port) {
this.port = port;
}
public void run() throws Exception {
EventLoopGroup bossGroup = new NioEventLoopGroup();
EventLoopGroup workGroup = new NioEventLoopGroup();
try {
ServerBootstrap serverBootstrap = new ServerBootstrap();
serverBootstrap.group(bossGroup, workGroup)
.channel(NioServerSocketChannel.class)
.childHandler(new ChannelInitializer<SocketChannel>() {
@Override
protected void initChannel(SocketChannel socketChannel) {
socketChannel.pipeline().addLast(new DiscardServerHandler());
}
})
.option(ChannelOption.SO_BACKLOG, 128)
.childOption(ChannelOption.SO_KEEPALIVE, true);
ChannelFuture channelFuture = serverBootstrap.bind(port).sync();
channelFuture.channel().closeFuture().sync();
} finally {
workGroup.shutdownGracefully();
bossGroup.shutdownGracefully();
}
}
public static void main(String[] args) throws Exception {
int port;
if (args.length > 0) {
port = Integer.parseInt(args[0]);
} else {
port = 9000;
}
new DiscardServer(port).run();
}
}
|
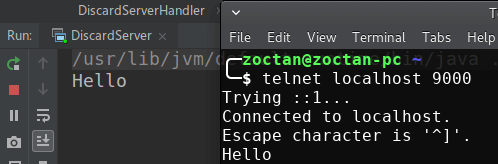
为了能看到效果,改造一下 channelRead 方法,让服务端在接收到消息时能显示出来:
1
2
3
4
5
6
7
8
9
10
11
12
13
14
15
16
17
18
19
20
21
| @Override
public void channelRead(ChannelHandlerContext ctx, Object msg) throws Exception {
ByteBuf buf = (ByteBuf) msg;
try {
System.out.print(buf.toString(CharsetUtil.US_ASCII));
} finally {
buf.release();
}
}
|
为了方便,客户端直接用 telnet 进行测试:
ECHO 协议
到目前为止,服务端还没有发回过响应(因为是 DISCARD 协议)。
让我们实现 ECHO 协议,写一个可以“回音”的服务端。
只要改造一下 channelRead 方法就好了:
1
2
3
4
5
| @Override
public void channelRead(ChannelHandlerContext ctx, Object msg) throws Exception {
ctx.write(msg);
ctx.flush();
}
|
ChannelHandlerContext 的对象提供了各种操作可以让你触发各种 I/O 事件和操作。这里我们调用了 write 方法将收到的消息逐字写回。
注意,这里我们并没有像 DISCARD 例子那样释放收到的消息,因为 Netty 已经在你写回消息时为你自动释放了(和流的概念差不多)。
调用 write 并没有立刻将消息写回,而是在内部缓存起来了,还需要调用 flush 才能写回。你也可以使用更简洁的 writeAndFlush(msg) 方法。